How to build a Product: From idea to code
How to go from an idea to an actual product. A story about product development

In this article, I'm going to describe the product development process of focusd, a zen-productivity app that I'm currently building together with André.
The order of the sections in this post corresponds to the steps we've been through so far. Don't misjudge this as a waterfall process though. We're going back and forth between certain parts, and will continue to do so. Hopefully, this post will be useful for anyone interested in building digital products, or just curious to know what it involves.
Warning: This is a long post, so go grab a cup of coffee (or tea 🍵) before you dive in.
André and I are both Indie Hackers. We're bootstrapping products together. We try to stay lean and scrappy as we don't have the luxury of external funding. We're not interested in getting funded at all. We're after sustainable growth and freedom, not growth at all costs!
Ideation, brainstorming, and design sprints
We started our journey by running a few ideation sessions in pure brainstorming mode. We took inspiration from the Design Sprint 2.0 method but didn't do a full-blown design sprint. We hacked our way through the process.
Since we live in different countries, we decided to used a shared Figma FigJam file. This has allowed us to draw freely, add Post-It notes, comments, arrows, colors, screenshots, etc.
During this exercise, we focused on:
- What problem(s) the app would solve (i.e., define our challenge)
- How we could solve those (i.e., research, find inspiration, and produce solutions)
- The processes behind our solution
- Storyboarding
Thanks to this step, André and I have created a shared understanding of what we set out to fix/build, and we've explored potential ways to solve the issues we noticed.
Since we are building a product to solve some of our own pain points, we didn't have to run through many interviews to figure out what problem to solve; we knew already. As productivity-focused people, we often waste time and energy switching between different tools for note-taking, time blocking, etc. So that's one problem we focus on. Another is that we have already found solutions that integrate calendars (yay), but none integrating with our existing calendars (nay). One last issue is that many tools in the productivity space are packed full of features, and usually do a poor job at letting us focus. And focus is paramount for productivity. So we decided that we wanted to fix that as well.
Long story short, the ideation phase is critical. It helps identify problems to solve, rapidly explore potential solutions and, most importantly, create a shared understanding.
How to validate the idea
Initially, I tried to convince André that we needed to try and validate this idea before building the product. But soon enough, I shared André's view that we were actually scratching our own itch. This product is a product that we would both happily pay for as productivity nerds. And if we care, then we are surely not alone. I'm currently on a quest to remove clutter from my digital life. And using fewer tools is a clear win for me.
So instead of trying to validate our idea, we instead decided to focus on invalidating some of our assumptions about the business. In any case, we want to make our first sales within the next couple of months; not two years from now.
Ultimately, even if this project fails, we will have learned a ton (e.g., designing with Figma, building nicer landing pages, going from zero to code faster, etc), and we will have built something useful for ourselves.
How to organize the team and write documentation
All projects require a minimum amount of organization and documentation. We started by creating a Slack for discussing easily, with a few channels: #audience-building, #competition, #general, #people-to-interview, #productivity and #random.
Documentation-wise, we've decided to use a shared Notion space. Inside of this space, the homepage lists the things that are on the top of our "shared mind":
- Current focus
- Next steps
- Open questions
Those are simple lists that allow us to easily prioritize our work, and quickly restore our shared mental context between sessions. No need for fancier issue tracking systems at this stage!
Next to those priority lists, we have created pages for various aspects of the project:
- Business model
- Marketing (e.g., copywriting, landing page, social media, etc)
- Core concepts and ubiquitous language
- Ideas
- Collaboration
- Infrastructure (e.g., DNS, sub-domains, etc)
- UI
- UX
- ...
Later on, this space will also hold the product documentation, the internal documentation (e.g., our processes, technical details, etc), and more.
This space acts as our single source of truth to this project. It's the entry point to everything else.
How to share passwords
The next thing we needed was a shared password database. This is critical for security. We don't want to duplicate passwords all around and share those via Slack and other communication channels.
How to explore the feature set: Jobs To Be Done (JTBD)
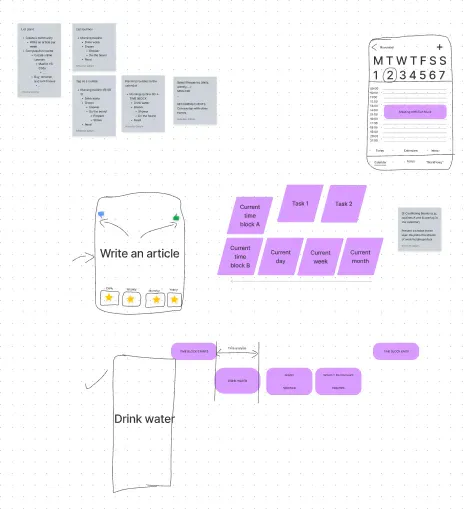
After our ideation phase, we've created a User Story Map. User Story Maps are particularly useful to explore the different Jobs To Be Done. If you don't know about JTBD, then make sure to check out this article. We created ours using Miro, as it has great support for those.

User Story Maps put emphasis on user stories rather than product features. There's some overlap, but stories are user and goal-centric, which is much more interesting for prioritization!
For each user story, we thought about the different steps required (i.e., the steps of each activity):
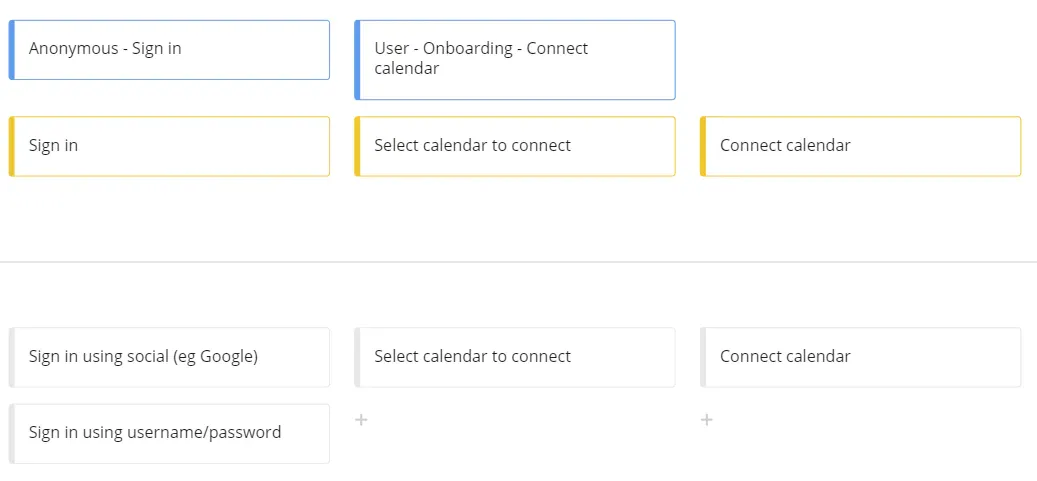
Here's a first example: anonymous users that already have an account need to sign in. They can do so using social or username/password.
Here's a second one: authenticated users need to go through the onboarding process. When they do so, they first have to select a calendar to connect, and then connect the calendar. Once that is done, our app will start synchronizing contents. So that specific story has different steps.
And a more involved one: authenticated users within the note-taking mode can schedule a routine or a plan. To do so, they (1) select a bullet point that they want to schedule, (2) drag and drop it onto the calendar to schedule it, and define date/time/duration. Finally, they (3) confirm, then our app (4) creates the event on their calendar and (5) create the link between that calendar event and the user's outline.
Each user story describes a job to be done from a rather high-level point of view. Technical details are mostly ignored here; that's for later.
User stories are arranged horizontally and put together, those describe the entire user journey. From the moment they reach the landing page, to the moment they use various features to achieve specific goals. Everything should be there, including data exports, account deletion, referrals, etc.
Finally, vertically we created one line per release/milestone. For this particular project, we kept things simple, we simply have MVP (i.e., what we need RIGHT NOW) and Backlog, for ideas and things that can wait:
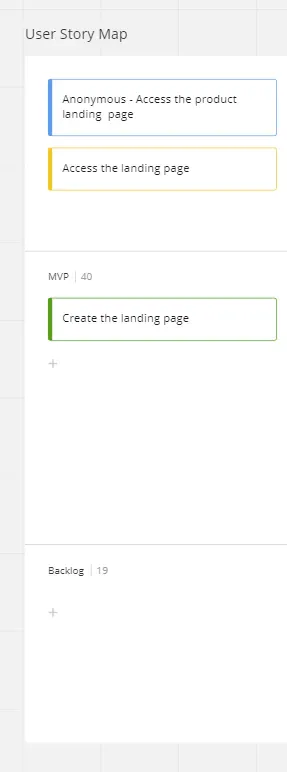
Thanks to those lanes, we can easily prepare (and maintain!) a product roadmap. We have done the prioritization exercise once, but will refine the map every time new information is known (e.g., feature requests, new ideas, etc). By organizing stories this way, we can easily see what we need to focus on next, and get a clear view of our current progress (e.g., by changing the color of each story).
User Story mapping is a super useful technique to dive deep into the different parts of the journey, actors and their jobs to be done, and as a way to visualize priorities and roadmaps.
How to design the User Experience (UX)
At this point, we had a clear understanding of the problem, as well as the different stories we wanted to focus on initially. The next step was to envision the User Experience (UX) of our product.
André and I aren't UX or UI designers, but we have learned to appreciate Figma. Also, we each brought our own sensibilities and took advantage of our previous experiences. For instance, I brought in the knowledge I acquired while researching and writing the second volume of my Dev Concepts Series: What Clients Need.
We started by thinking about the customer journey from a very high-level point of view:
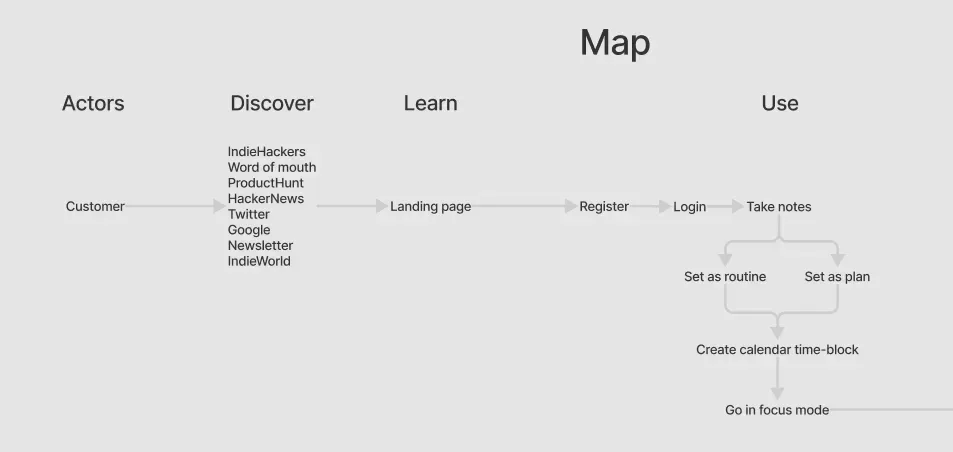
This helped us clarify some ideas about how people would go from hearing about our product to using its features. This also served as the very starting point for our storyboard.
Next to that, we explored the Jobs To Be Done, again from a high-level point of view:
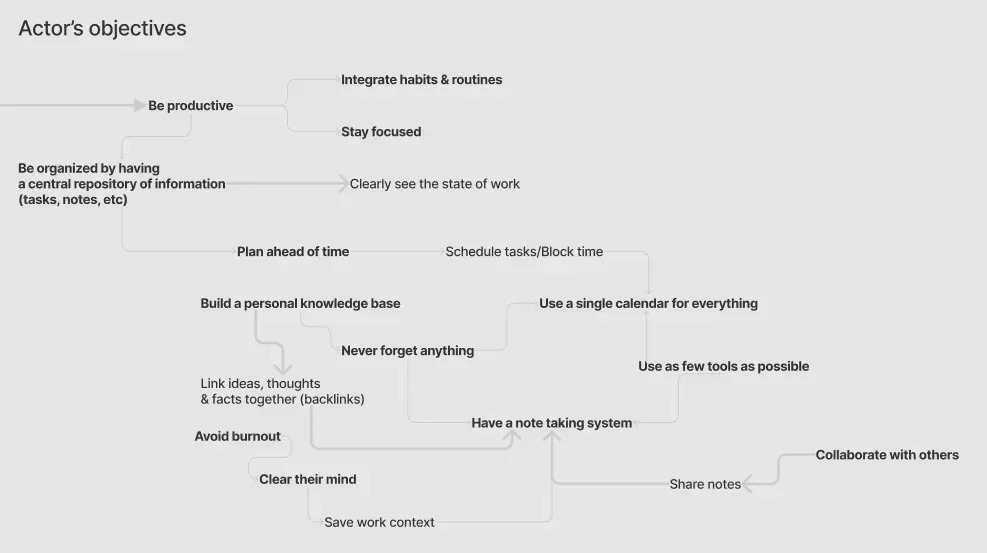
This gave us a clearer view of the important aspects to focus on during our UX work. We then summarized the key characteristics:
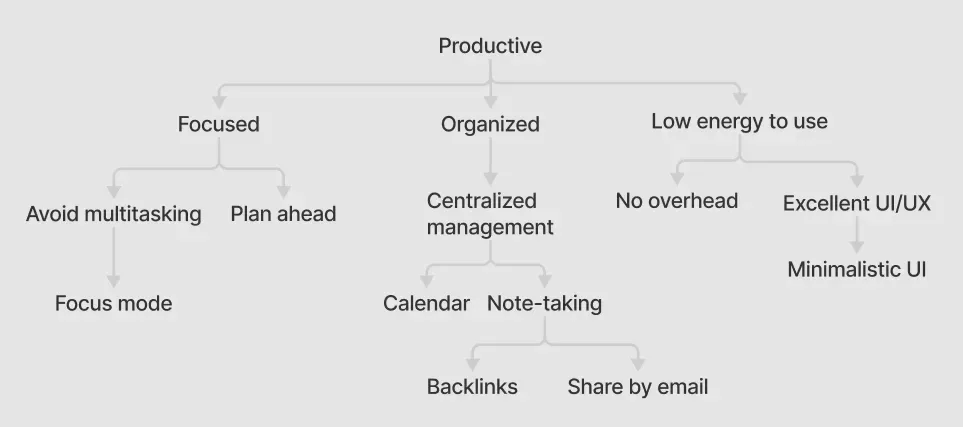
Maybe this will look as heresy to professional UX designers, but this was clearly useful for us to know what to pay attention to and what to avoid.
Next up, we looked at the information architecture. This helped us identify and uniquely name the main concepts, their properties, and relationships. We reflected our findings in our Notion space to define our ubiquitous language:
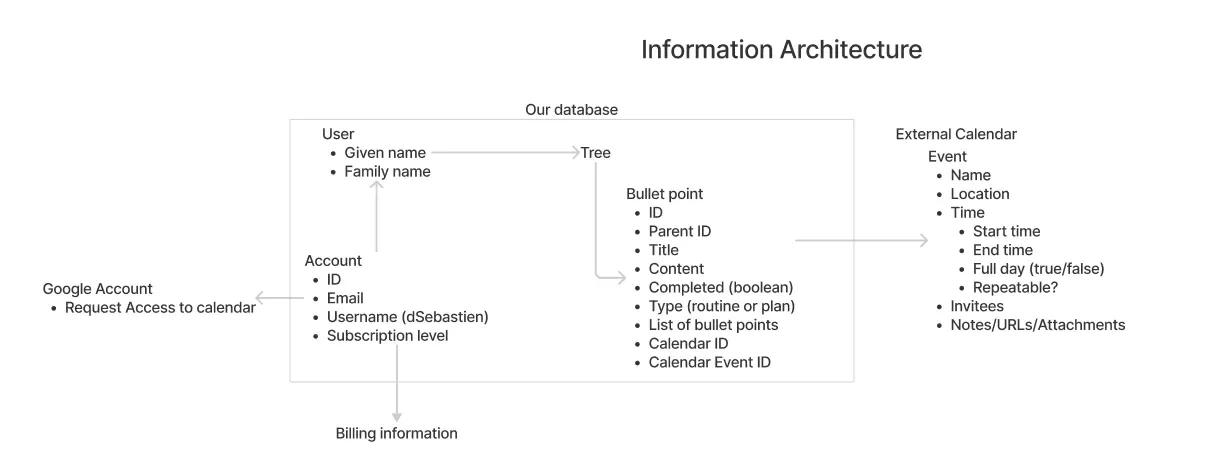
This is obviously the first of many iterations.
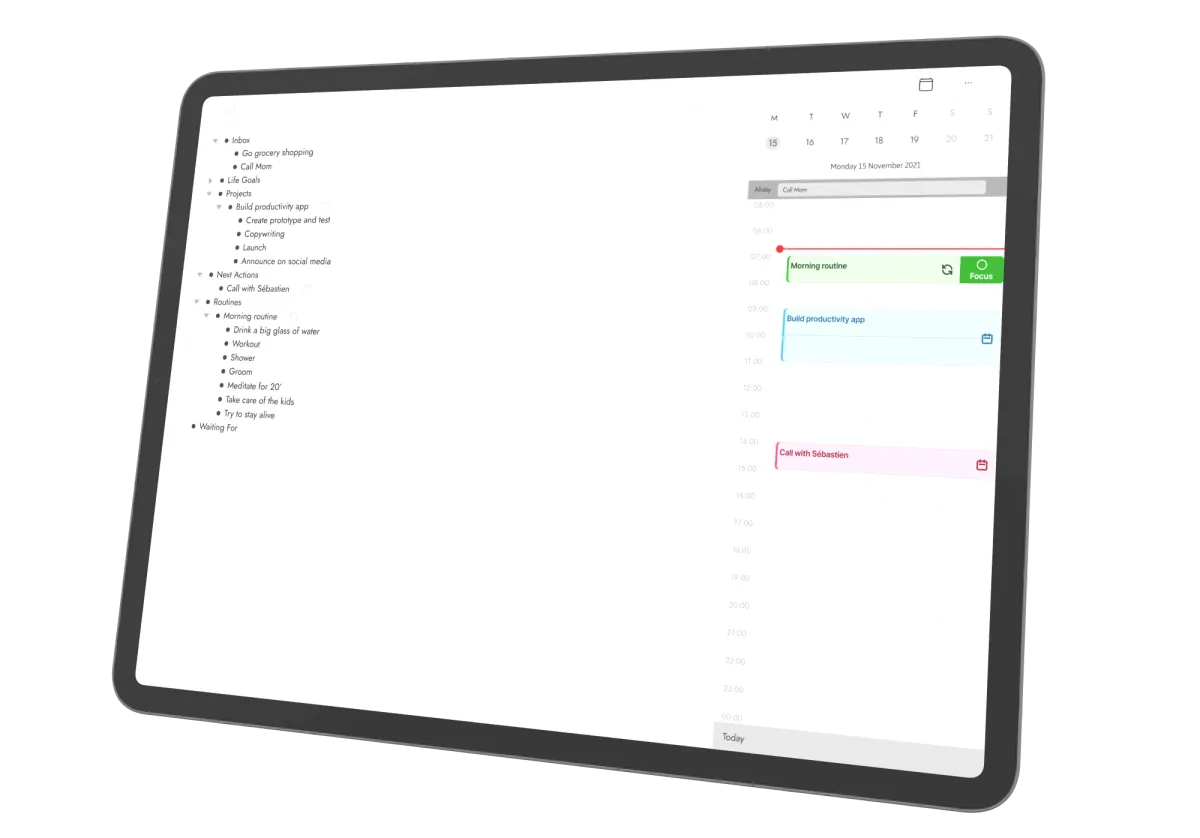
After that, we dived into the crux of the UX work, the experience itself! We created a bunch of prototypes, each focused on specific jobs to be done. Since we had the User Story Map, it was easy enough for us to check if we forgot to think about important elements.
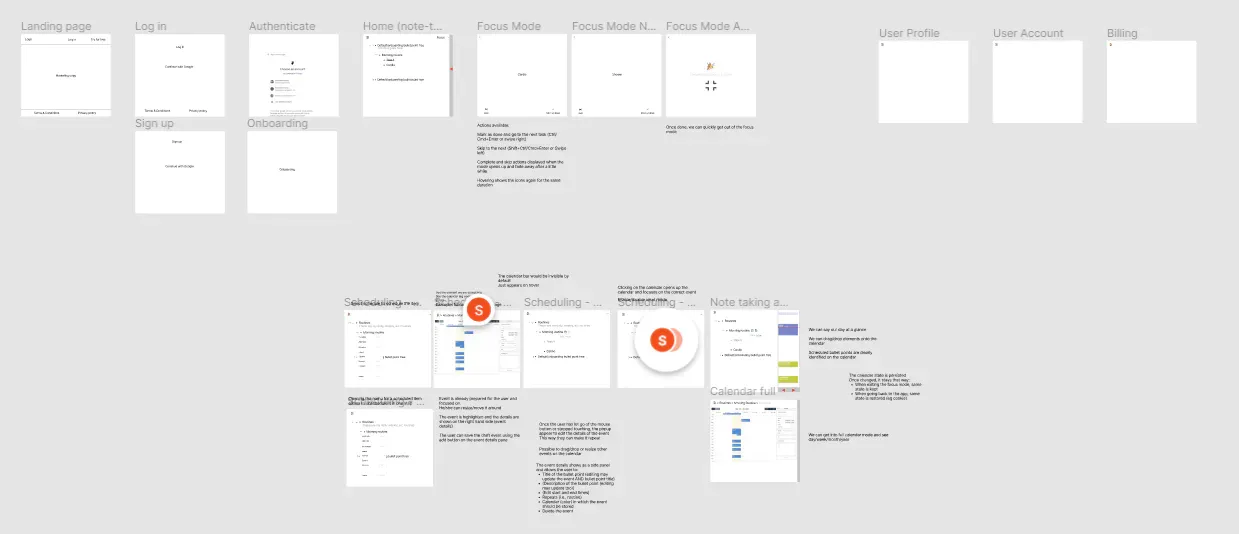
Let's look at two of those more closely. The first one is our focus mode:
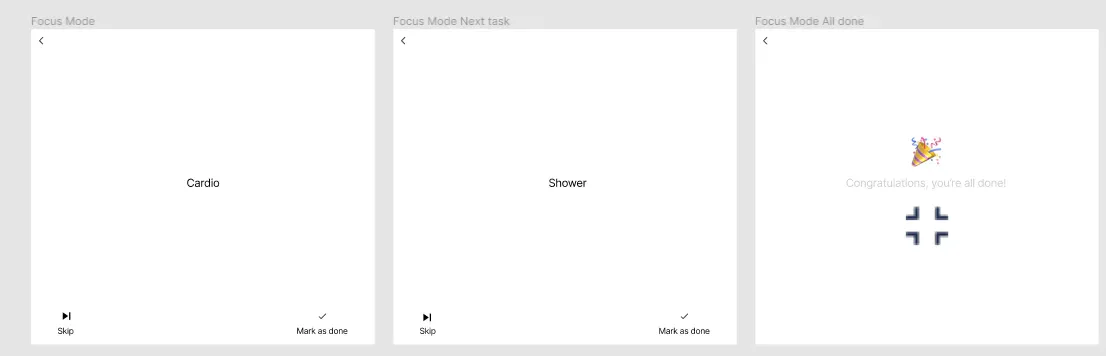
As you can see, we are serious about minimalism 😂. There's even less UI in our "final" UI prototype.
The second one is our calendar integration:
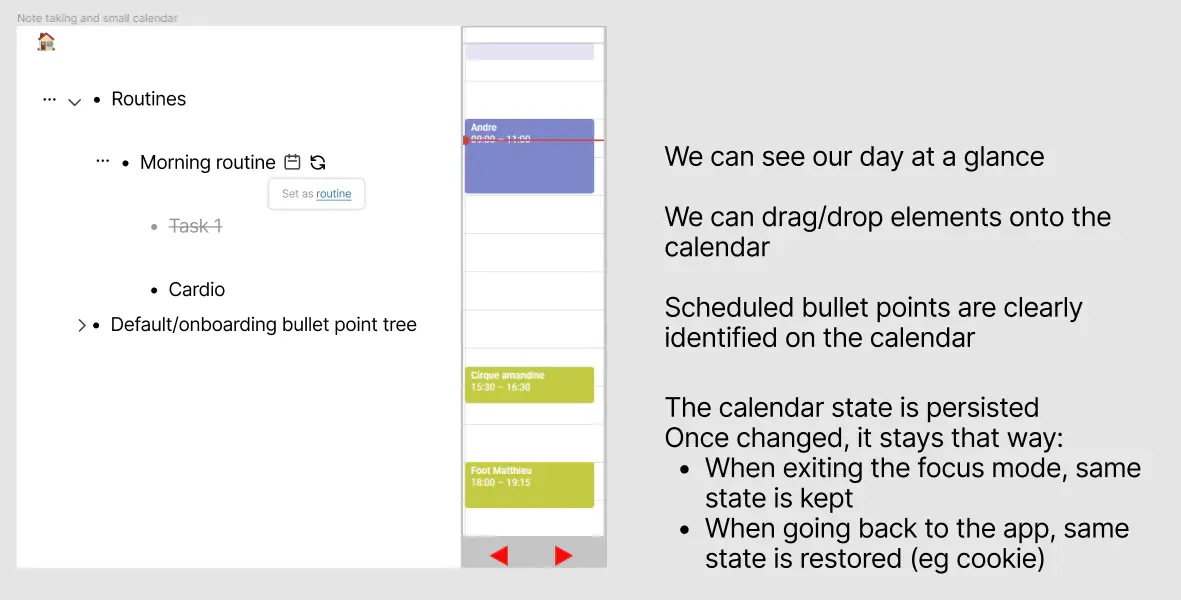
For this one, we imagined integrating the calendar on the side and making it easy to associate bullet points in the outline with events on the calendar. From a UX point of view, this was a huge step forward. By allowing users to show/hide the calendar, they can adapt the product to their current activity. If they hide the calendar then they can focus on note-taking. If they show it then they can focus on planning their day or looking at what's coming next. Finally, by expanding the calendar, they can focus on their week/month and focus on the big picture.
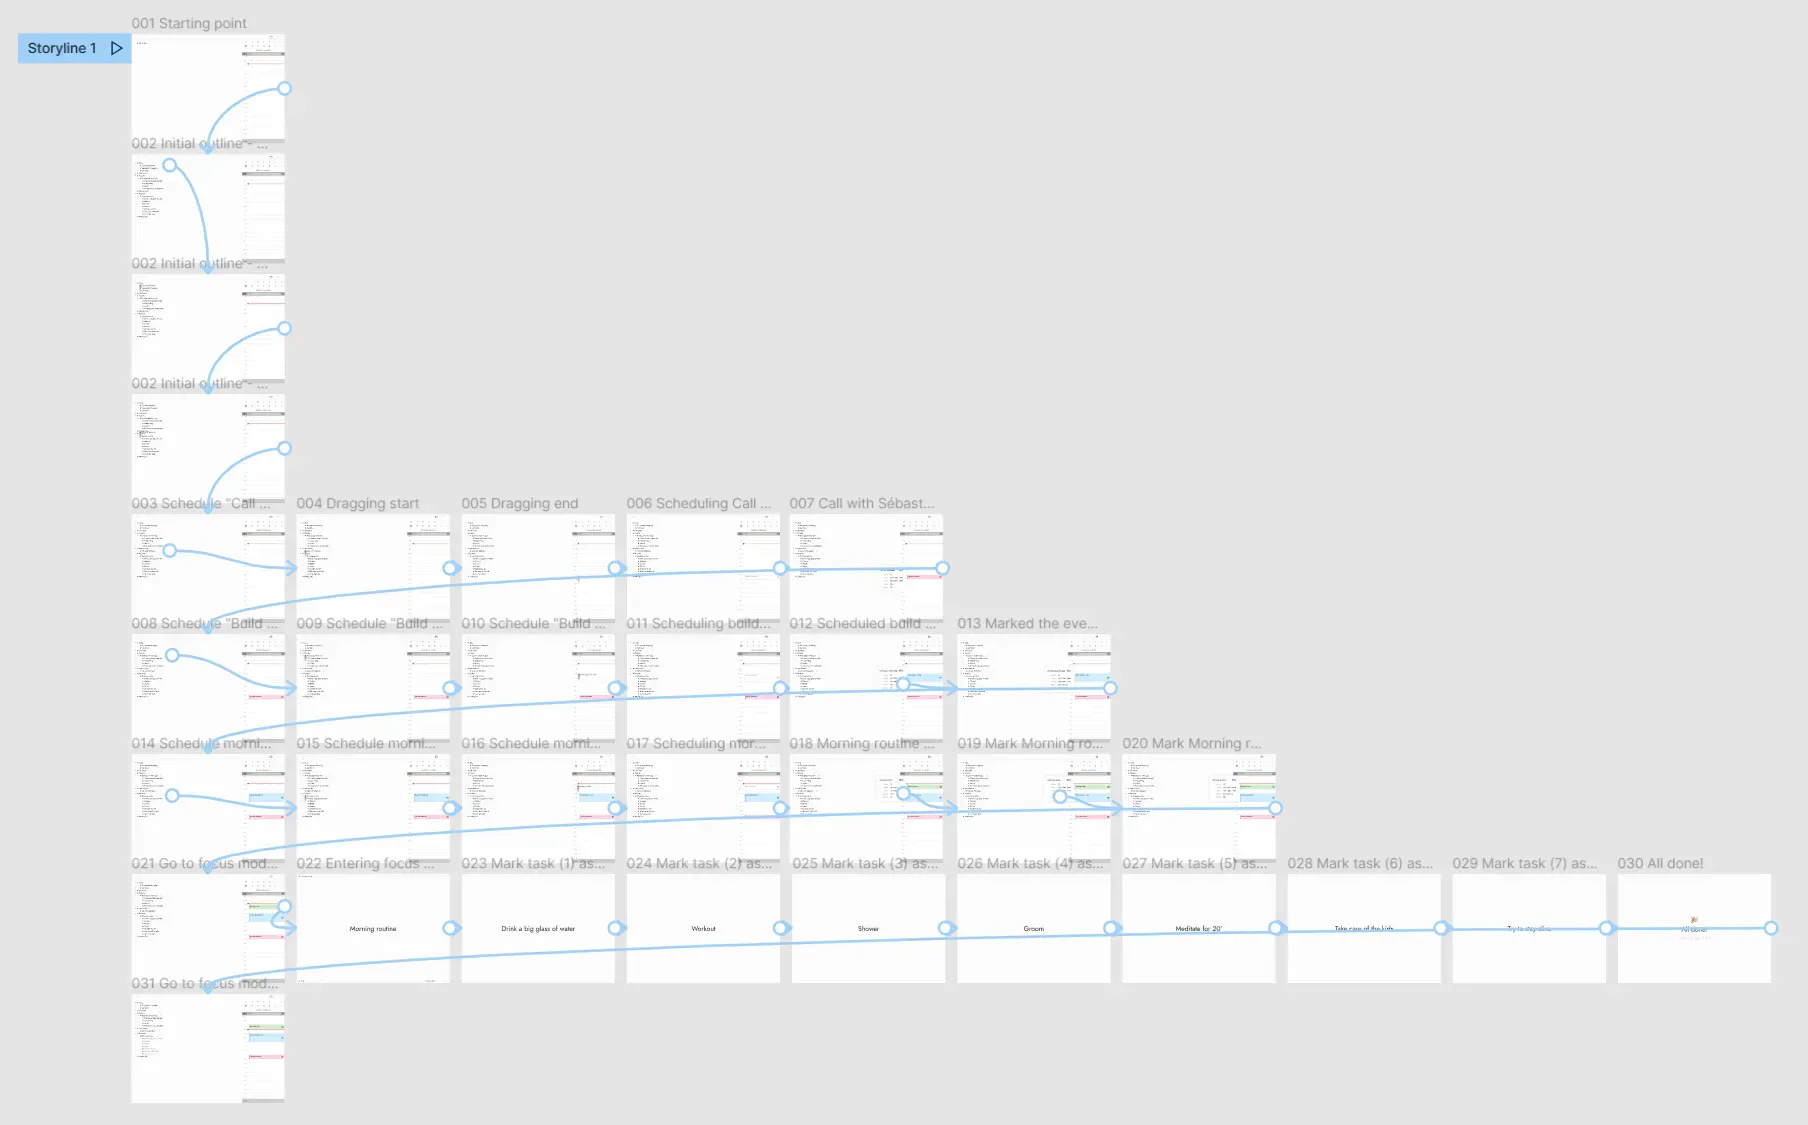
Finally, we validated the soundness of the experience by creating an interactive prototype with Figma:

It took a bit of time, but it was well worth the effort. It helped us fix a ton of issues long before even starting to think about UI work. It would've been much more costly to fix those issues later.
At this point, we had a clear idea about what the experience would feel like, and we already had something we could show and (in)validate.
How to learn more about the customers: Conversations
Following ideas from The Mom Test, we also discussed with a few people in order to get a feel for what issues others faced around productivity. And indeed, context switching was an issue for many. We did not mention our idea though, since we had nothing to sell yet.
How to develop the User Interface (UI)
Once we had a clear idea about our UX, we turned our attention to the User Interface. This time around, we were looking at other concerns: colors, typography, look and feel, components and variants...
We started by designing the home screen and then started extracting components one by one. We were learning how to use Figma along the way, so it was a good exercise for us. Once we understood how to properly use components and integrate transitions between variants in the prototyping mode, we started having tons of fun.
One by one, we designed our components. Header, Breadcrumb, Context menu, Outline, Bullet point, Progress indicator, Calendar, Calendar events, etc. While doing so, we solidified our design system and ensured consistency across the whole interface.
Before long, we had a whole collection of reusable components at our disposal:
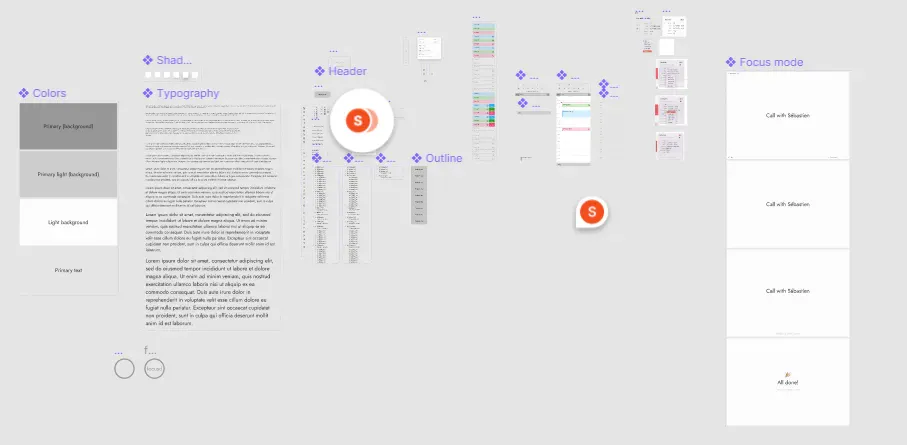
Without realizing it, we actually designed something rather complicated for Figma. Simple components are fine, but an outline is anything but a simple component. The recursiveness is problematic for Figma. But we found workarounds, we wouldn't let that stop us! We just hacked our way through using placeholder components.
User Interface work is critical as it's what allows us to actually imagine how the app will be. It's something that we could've skipped for sure, but we did not want to. Doing so would have been shortsighted. During our UI exercise, we kept discovering issues with our initial UX, and we iterated many times over to reach something both usable and pleasing for the eyes.
UI design is a really forcing function to become more realistic about what we can actually deliver.
Since we were using the free tier of Figma, we were limited to 3 design files in total, and couldn't use a shared library. So we decided to regroup all design tokens for the UI in a single file.
Building software is much more costly than creating a user interface in tools like Figma. UI design is malleable and is easy to change. Code much less so. That's why we spent a good deal of time working on this part. The second benefit is of course that we have everything at our disposal for the development. We know about our components and their variants, we can export the icons and other assets in SVG, etc. Moreover, we can always come back and adapt things later, and even hand over the design to an expert once we have the budget for this.
How to prototype the User Interface
Once we were done with the bulk of the UI and had reusable components, we started looking at creating a UI prototype. We wanted to be able to play with the actual UI before building it. Also, we wanted to create an introduction video to showcase the tool and give a really good impression.
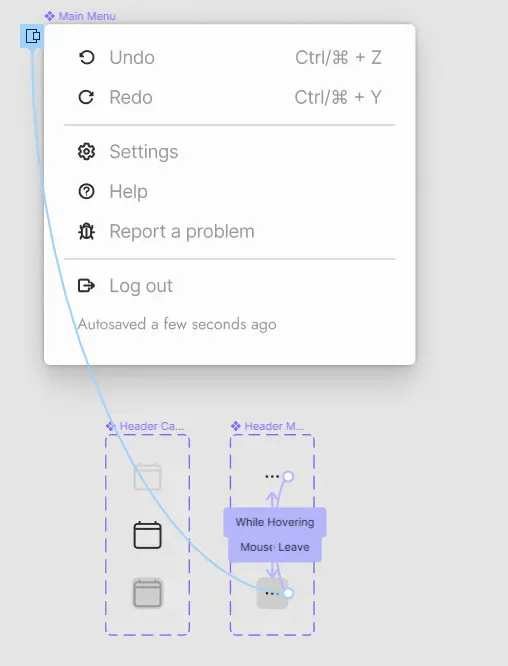
We then added transitions between UI components in order to make them interactive. That is by the way a truly killer feature of Figma:
We then wrote a script to tell a story. The story of someone willing to have a productive day. The script described all of the steps that we would take and showcase in our video. Then, we created one "frame" per step in the story.
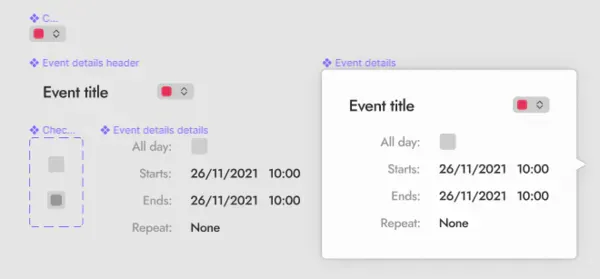
Creating the screens was rather straightforward thanks to our components & variants. Figma makes it a breeze to assemble complex UIs by combining component instances:
Once the screens were ready, we simply added transitions as well as animations to make it all nicer:
Video intro
Finally, thanks to the UI prototype, we were able to record a rather convincing (hopefully 😂) video:
This is something we could easily share around to gather feedback. Of course, following The Mom Test, we remained careful with the positive signals we received. At this point, our goal is merely to grow our audience for this project, build a community and learn as we go.
How to choose a product name and acquire the domain
Naming is hard. As a software engineer, this is one of my favorite sentences. It's fun because it's true. Naming is really hard. It's hard because good names must have many qualities. Names must be clear, understandable, not subject to misinterpretation, and a lot more.
We had a product in the making, but it didn't have a name. So far, its codename was "Productivity App". Clear, but not very memorable. We made a list of 20+ names, added our votes, explored the availability of the domains and whether those names were trademarked or not. As you can imagine, most of the names we came up with were already taken.
To help us out, we've used tools such as Namelix and Namesnack. For the trademark checks, we had to look at different international databases like USPTO, BOIP, and WIPO.
Of course, the domain name is the key element that goes along with the name. Choosing and getting the domain is actually intimately related with choosing the product name. I'd even argue that the availability of a domain is the most defining factor.
To explore the availability of domain names, we used Google Domains, And domain.garden
How to build a community around the product
With my recent experience as a rookie community builder, I've learned to appreciate the joys and perks that come along with online communities.
I only started considering community building as an activity for myself after reading Arvid Kahl's book: The Embedded Entrepreneur. In that book, Arvid makes a really strong case for building an audience from the very start in order to avoid the common pitfall: "Build it and they will come". I think of this book as a really useful complement to Eric Ries' book (The Lean Startup), which focuses way more on validation. By the way, another great read is Sahil Lavingia's: The Minimalist Entrepreneur". Sahil also recommends growing an audience by creating/joining communities first and alongside the business. Obviously, both know what they're talking about. And second, it feels right. That's why it's now something I recommend to everyone building products. Choose your niche, build an audience alongside your business, and create or join communities.
As soon as André and I chose to work on this project, I knew that I wanted to build a community focused on productivity. I'd been exploring and experimenting with productivity techniques for 20 or so years, so by now I probably have a thing or two to share with my Internet buddies ;-)
That's why we quickly kickstarted the focusd community. It's not just a community for the product itself. Instead, we want it to be a space for all productivity enthusiasts, whether they like/use focusd or not. We just want to help each other out and help people make better use of their most precious resource: their time ❤️.
Why and how to create a waitlist
As our project was not built yet, we needed a way to keep track of who was actually interested in the project. We needed to create a waitlist. The easiest option was to build a mailing list. For this, we chose to use ConvertKit. They provide easy-to-use tools to create subscription forms, analyze the audience, send e-mails to subscribers, as well APIs.
The waitlist is critical as it is a door right to the inbox of our subscribers. Having the ability to show up in someone's mailbox is very valuable, and we didn't want to miss out on the opportunity.
The waitlist will be very useful for us to share news about our progress, news about the community we're building, and to be truly open about the whole process. I consider people on the waiting list as fans, supporters, and friends! 🙏
How to be present on social media
Alongside the community and mailing list, another aspect is social media marketing. Being present on social media is not really an option. I personally chose to create my own brand, but my product also needs its own space. So far we have our Twitter account, and we will later expand to reserve names on different social media platforms.
Further down the road, this will give us more space to discuss with our audience, additional means to discover potential customers, and to share news about the product.
Again, social media presence requires checking whether some usernames are available or not. For this, we used Namecheckr.
How to prepare the sales copy, the landing page, and design a logo
With our initial UX and UI, we had almost everything we needed for our landing page. We wanted to have convincing visuals before we launched it. Because we didn't want to just describe the idea, we wanted to show it.
The only thing we lacked was a logo for the app. So I quickly created one using Figma's awesome vector drawing tools:
Of course, the logo is just a detail compared to the sale copy. So we put a lot more effort into that. We've combined the experience of André with Internet wisdom to focus on the reader, talk about benefits rather than features, providing vivid supporting details and visuals.
After the copy, we focused on creating the landing page itself. As usual, there were many options to choose from. Historically, I've always preferred to do everything by myself: the custom WordPress theme of my long-gone initial blog, my new Website's design, my company's Website, etc. The upside of doing everything myself has been total control. But the downside is also total control, and the opportunity it creates to endlessly fiddle with an infinite amount of details.
Another approach was to take a ready-made HTML template and use that to create the landing page. But to me, this leads to a ton of frustration. I get to see the code and suffer from not liking the style, the mess, the lack of proper naming, etc. It hurts me bad. And it's also subject to the same downside as doing it all by yourself.
Finally, on the other side of the spectrum, there's the option that we decided to go for: a SaaS like Carrd or Webflow. I chose Carrd because it's made by Indie Hackers, and I prefer to support other Web entrepreneurs like myself. The benefit of services like Carrd is the fact that they're WYSIWYG solutions. Create a site, select a ready-made theme and use the editor to add/edit/remove elements, customize the colors, the look and feel, etc. Using this felt liberating. Instead of spending days, I spent about a day and I was done. I had mobile support, mailing list integration, analytics integration, it was hosted, I could use my custom domain.
I'm not saying that homemade Websites are bad, but for engineers like myself, they're the perfect excuse to waste time playing with tech for tech's sake.
The current goal of that landing page is to draw more people to join the waiting list and our community. Of course, this corresponds to the top of our future sales funnel. But it's a win-win type of deal. People who join us for the ride get to hear and influence everything about the product's development. On the other hand, we get to share knowledge and ideas with each other. That's what I love about audience and community building. Both are different, but both include benefits for everyone involved.
We launched our landing page as soon as it was ready, shared it around, gathered feedback, and kept iterating. And we'll continue doing so as we move further along with the development.
How to start marketing the product
Audience building, community building, and digital marketing go hand in hand. Now that our landing page has landed (pun intended), we can share the link around with our friends, colleagues, acquaintances, social networks, communities, and "scary" strangers. This helps us grow the audience, bring curious people into our community, and gather more feedback.
Spamming the link around would be ineffective, even when combined with SEO. People mostly don't care. As a matter of fact, we only want the right people to care, so we are thinking carefully about who we reach out to and who we try to attract.
That's where content marketing comes into the picture. To attract our ideal customers, we need to create useful content and share it at appropriate locations. The content needs to establish us as domain experts, but also as genuinely friendly and caring human beings. It's not about being fake, it's about being humble, sharing what we know, sharing our ideas, and dreams about the future.
We're building a product that we sincerely hope will help people on a day-to-day basis. For them to choose our tool would mean the world to us. But the only way for us to convince them that our tool is a good one is to show them that we have clear ideas about the subject. Clear ideas about what productivity is all about. Clear ideas about how to take smart notes. Clear ideas about why time blocking is essential. Clear ideas about how it all fits together to make people more focused and more productive.
But subject matter expertise is not enough. Since we're building a product, we also need to convince people that we're not fooling around with code like wannabe wizards. No, we must convince them that we're actual software crafters and that we are here to build something solid. Something that will work flawlessly, and that will stand the test of time. It's tough to do that.
By now, you probably get the ultimate goal of this article. It's not only about product development. It's also about showing our expertise and intent. It's about demonstrating that we are serious, committed and that we are putting our heart and soul into this project. It's not just a fun side project. It's a business that we are trying to build.
At this stage, we just want to raise awareness from the right audience (e.g., on the Indie Hackers community, on productivity-centric subreddits, on Tech Twitter, etc). We don't plan on going all-in with content at this point. But we will ultimately get there as I enjoy writing and sharing knowledge ;-)
How to develop the business model and define the initial pricing strategy
So far, I mostly focused on the technical aspects. But digital products also require a clear business model and pricing strategy. There are countless options here, and each business is different. That's a part of the business where creativity is also important, even if it doesn't look like it at first glance.
I'll keep this subject for another day, as this article is already pretty long.
For focusd, we have decided to include a free tier, but to limit the note-taking side in a gentle, unobtrusive, and respectful way. This is something we will explore once we build that part of the product. Our current idea is to limit the number of bullet points that free users can add each month. Once they hit the limit, we will gently remind them about the limitation every time they come back to the application.
I'd also like to build this app as an Open Source project, as I'm a big believer in open solutions. That being said, it's something we haven't decided yet with André. So we'll see about that!
How to go from idea to code
At this stage, we have the UX, the UI, interactive prototypes, a waitlist, a domain, a landing page, a logo, a name, a domain. What's missing? What's next? Well, a product of course!
Products don't always require us to write code. Nowadays, NoCode and LowCode are all the rage. There are many solutions such as Bubble out there to help makers build products with less (or no) code. But in the case of our product, I'm pretty convinced that the way to go is to build it all ourselves. There are two reasons for this: (1) we include an outliner and (2) we want strong interactions between the outliner and the calendar, but also between the calendar and the actual calendar of the user (e.g., Google Calendar). I don't think that NoCode tools can let us build an outliner or easily build the integrations we need for the calendar. But I'd be happy to be proven wrong on this one (I'm really not a NoCode specialist!).
The next steps for us are to think about the solution architecture (i.e., the big building blocks):
- What front-end technology to use
- How to build the user interface. For this part, the good news is that our work on the design provides us with a really solid starting point
- What back-end technology to use
- Which communication protocols to rely on
- What sort of data store to use
- Which architectural patterns to implement
- etc
Next to that, we will also need to organize the development. We will use git as it is the de-facto standard, but we have multiple choices for hosting (e.g., Github or Gitlab).
We will need to choose a programming language (most likely TypeScript, but I'm biased), libraries and frameworks. We'll need to start thinking about the data structures, data models, the types of queries, APIs, testing, etc. This will all start with prototypes, exploring different aspects of the product. Prototypes for the outliner, for the calendar, for the calendar integration, etc. Step by step we will integrate features into the product, which will require us to discuss the branching model, code review process, code quality checks, etc.
We will need to discuss infrastructure and hosting (e.g., Docker/Kubernetes, AWS/Azure/GCP), Continuous Integration (CI), Continuous Deployment/Delivery (CD), release management, support processes, maintenance, product documentation, payments, etc.
Long story short, we will have tons to think about. But most importantly, we will need to be pragmatic. Because there are only two of us for this project, with limited time on our hands and a lot of work to do. That's also a key aspect of building bootstrapped products. It's about delivering what users really need, with a great level of quality, as efficiently as possible and without sacrificing the pleasure of making. Quite a challenge!
Conclusion
In this article, I've explained the different steps we've taken so far to go from an idea on a napkin to a product in the making. At this point, we have no idea if this is the ideal way to go, but it's the way that feels good to us. And after my last startup experience, I've learned to listen to my gut feelings. And you should too!
To conclude, if this article has taught you anything useful, I'd like you to share it around; it would really help us out ❤️ And if you have comments, feedback or ideas about this article or about focusd, then please don't hesitate to reach out to me. My DMs are open on Twitter, and you're welcome to join my communities :)
That's it for today! ✨